There’s no definite #1 out there that can win every battle. Matchups, stats, weight, and even the stadium type affect how things play out. In this guide, we’ll break down the best MFBs by type (Attack, Defence, Stamina, and Balance).
Here’s a list of all the strongest Beyblades (stock only):
- Balance Type: Diablo Nemesis, Meteo L-Drago, Gravity Perseus, Fusion Hades
- Stamina Type: Phantom Orion, Scythe Kronos, Hell Kerbecs
- Attack Type: VariAres, Blitz Unicorno, Lightning L-Drago, Big Bang Pegasis
- Defence Type: Basalt Horogium, Death Quetzalcoatl, Duo Uranus
But what if you’re not interested in a type-wise breakdown? Well, we have you covered. Here’s the list of the overall best stock Beyblades based on countless battles and opinions (again, stock only):
- Phantom Orion B:D — Widely regarded as the king of stock stamina and arguably the strongest stock Beyblade overall in a no-customization format. Its ability to spin for extremely long durations and win endurance matches is virtually unmatched. If both players use stock Beyblades, having Phantom Orion often confers a significant advantage in outspins.
- Diablo Nemesis X:D — Renowned as the heaviest and one of the hardest-hitting stock combos. Diablo’s weight and design let it bully most opponents around, leading many to consider it the best stock for head-to-head battles (especially in Attack mode). Many Bladers will flatly confirm that Diablo Nemesis is best overall. Its smash power and tankiness make it a top contender in any matchup, though its stamina is lower than Phantom’s.
- Basalt Horogium 145WD (Twisted Tempo) — The dominating Defence/Stamina hybrid of its era. While later 4D Beys surpassed it, Basalt Horogium remains legendary. It’s often cited in top stock lists for defense, and even in recent community rankings, it’s remembered among the best. It was once a meta-definer.
- Death Quetzalcoatl 125RDF — A 4D Balance/Defence stock that many consider almost unfairly good, thanks to the Death wheel’s balance and the RDF tip’s performance. It doesn’t have the same iconic status as Phantom or Diablo in mainstream circles, but competitive bladers frequently put it at the top of stock tiers due to how well-rounded and tough it is.
Strongest Balance-Type Metal Fight Beyblades
Balance-type Beyblades have characteristics of multiple types — they might hit hard, resist attacks, and spin a long time, but not necessarily to the extremes of specialized types. In the Metal Saga, many “Balance” Beys achieve this by mode change gimmicks or unique part combinations. Here we highlight stock combos that excel in versatility or unique effects like spin stealing.
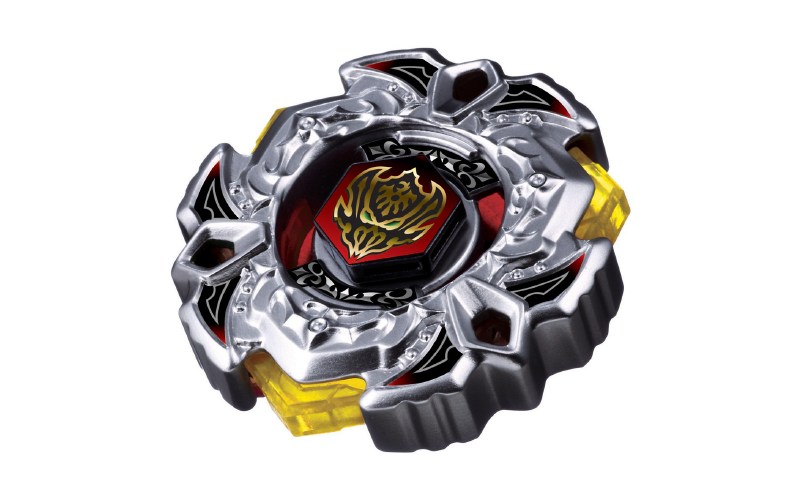
1. Diablo Nemesis X:D (Metal Fury/4D)
Series: Beyblade Metal Fury (4D, 2011) — Takara Tomy BB-122, Hasbro Hyperblades
Diablo Nemesis X:D is a Balance type dubbed “the Ultimate Beyblade” in the anime, and its design lives up to that name. It’s the heaviest stock Beyblade of the Metal Saga — the Bey weighs a massive ~62 grams and incorporates design elements of other 4D Beys. It has a mode change between Attack Mode and Ultimate Balance Mode. In Ultimate Balance Mode, the metal frame of Diablo flips, exposing a free-spinning sub-component and shifting weight outward. The Nemesis Clear Wheel is essentially a solid core that complements Diablo. The X:D (Xtreme Drive) bottom is another mode-changing part: it can manually switch between a wide flat tip, a semi-flat (S²D), and a sharp, or automatically shift when Diablo is in Ultimate Balance Mode. In stock, you can start Diablo in either attack-oriented or balance-oriented configuration.
Diablo Nemesis is famed for its brute strength. With all parts assembled, it weighs around 62-63 grams — in Standard format, that weight alone makes it hard to budge. In Attack Mode (commonly preferred), Diablo Nemesis hits with tremendous force; its heavy, uneven wheel can deliver knockout blows even to the most sturdy metal fight Beyblades.
It also surprisingly has decent stamina for such an aggressive wheel, because the momentum from its weight keeps it going. In Ultimate Balance Mode, Diablo’s wheel gains a free-spinning element and uses the sharp tip (S²D) of X:D, increasing its stamina and stability at the cost of some attack power. Free-spinning gimmicks in Beyblades help absorb hits better than fixed parts.
Sometimes, the Ultimate Balance Mode is quite underwhelming — the free-spin can reduce recoil but also cause Diablo to lose spin when knocked (it “gives” too much). Thus, competitively, most use Attack Mode with the X:D set to an aggressive tip.
Even launched straight out, Diablo Nemesis is hard to KO; it tends to either smash the opponent or at least stay until it wins by spin. It is somewhat prone to self-KO if it misses (especially if using the flat tip in a BB-10 stadium), and opposite-spin stamina can be an issue. But overall, it’s a beastly combo.
The blade is easily considered one of the overall strongest stock Beyblades ever made, particularly for its “tank” qualities. Diablo is the heaviest MFB Bey, and it hits hard. Almost every battle ends with it sending the opponent across the room. Diablo was so dominant as an anti-attack and attack combo that WBO formats at times had to account for it. The Metal Fight Wiki sums it up: “Diablo is a versatile fusion wheel… a great Attack wheel and a great Defence wheel due to its heavy weight.”
Its only real downsides are controllability and that X:D, while fun, isn’t the best tip in any one category. But make no mistake: Diablo Nemesis in stock form is a monster, often capable of defeating specialized customs. It’s the marquee Balance type of the 4D era and remains hugely popular among collectors and competitors alike. If you ignore Synchrome Beys, this is the heaviest Metal Fight Beyblade ever.
The 4D tip deserves a special mention. This is what makes Diablo Nemesis an unparalleled beast. In many ways, this is the overall strongest Beyblade in all of MFB, in part due to the tip. As a whole, the Bey is the perfect all-rounder for all types of attacks, matchups, and launches.
Diablo is the most versatile Defense wheel (or the close #2 after Basalt). It is the heaviest-ever fusion wheel across the entirety of Metal Saga. Technically, the Bey is supposed to be defensive, but it’s an excellent attacking Beyblade in practicality.
To truly maximize the potential of your Diablo Nemesis:
- Use an attack-type stadium like BB10 or Summit for better flower patterns. Many MFB stadiums unfairly penalize attack-type Beys. Nemesis can lose to Basalt easily in such stadiums that do not have the BB10’s slope, giving a huge advantage to stamina/balance setups.
- Use the GD Dual Launcher or a Rev-Up Launcher for maximum RPM for this chonky boi.
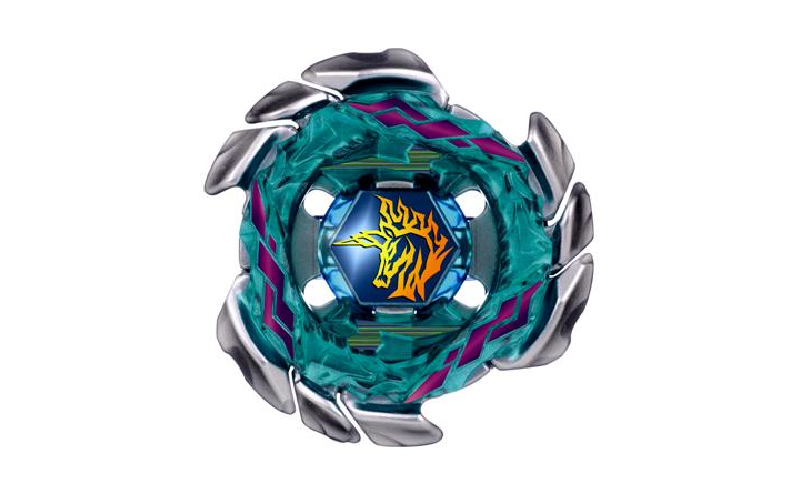
2. Meteo L-Drago LW105LF (Metal Masters)
Series: Beyblade Metal Masters (2010) — Takara Tomy BB-98, Hasbro Meteo L-Drago Energy Drain version
Meteo L-Drago LW105LF is labeled an Attack type, but it introduced the concept of spin steal in MFB, making it effectively a Balance/Stamina hybrid in battle. Meteo L-Drago’s Fusion Wheel is unique: it has a rubberized surface (the Meteo wheel features rubber dragon motifs) on a dual-spin core, but as an L-Drago, it only spins left. The rubber allows it to grab onto the opposing Beyblade’s spin. The stock has a Left-Wing 105 track (LW105), which has wing-like projections for downforce, and an LF tip (Left Flat), essentially a flat tip with a spiral design meant for left-spin. LF provides decent movement speed (though less grip than RF).
In terms of raw attack, Meteo L-Drago is not as powerful as Lightning L-Drago; instead, its strength lies in spin absorption. When battling a right-spin opponent, Meteo L-Drago’s rubber contacts will spin in the opposite direction, causing it to siphon rotational energy (this often looks like it’s “absorbing” hits). In practice, if you soft-launch or weak-launch Meteo L-Drago, it will collide gently and continually equalize spin, often resulting in a sleep-out win against a right-spin foe — basically a controlled spin-steal strategy.
In fact, we’re sure you must’ve seen videos on YouTube when Meteo was hand-launched or even just kept on the stadium vs. a hard-launched Beyblade, and it came to life.
Note: Spin steal is technically “spin equalization,” which means that the Bey equalizes its spin with the opponent. It will bring down the opponent’s RPM quickly (so attack-types relying on early KO will be less effective), but equalization means both will try to reach the same RPM. As the opponent loses spin, so will Meteo. In many cases, you will have a tie when both Beys stop at the exact same time. If Meteo had some LAD (life-after-death) mechanism, it could do wonders.
If you hard-launch it, the rubber can generate some smash attack, but Meteo’s lack of weight means it won’t hit as hard as the likes of VariAres or Diablo. Also, hard-launching reduces its spin steal efficacy because it might knock the opponent away instead of equalizing. Meteo L-Drago LW105LF can struggle in same-spin battles (against another left-spin, it loses the advantage of rubber contact and is simply a relatively light attack type with mediocre stamina). Against opposite-spin, though, it can be devastating, often ending matches in draws or life-after-death wins.
Meteo L-Drago has a bit of a divided reputation. The anime made it look invincible (never losing a battle on screen), which led some fans to overestimate it. Competitive players will, however, know that you can’t win easily with it in stock configuration — you have to weak launch it for it to be good.
When used correctly, many agree Meteo L-Drago is extremely fun and effective for spin-equalization. It’s frequently listed among the best stock Balance/Stamina types because no other stock combo can steal spin as well. But keep in mind that Lightning L-Drago is competitively stronger if you’re purely looking at win rate.
3. Gravity Perseus (Destroyer) AD145WD (Metal Masters)
Series: Beyblade Metal Masters (2010) — Takara Tomy BB-80, Hasbro “Gravity Destroyer”
Gravity Perseus is a notable Balance type with a dual-spin gimmick. The Gravity metal wheel can spin either right or left (the protrusions underneath the energy ring and on the fusion wheel that stop the opposite launcher prong don’t exist, so both launcher prongs fit this Bey). Stock Gravity Perseus came in two main versions: the Attack version (130RF) and the Defence/Stamina version (AD145WD). Here we’ll focus on Gravity Perseus AD145WD, which was widely distributed and often considered the balanced setup.
It features the defense 145 track (AD145) and a WD tip for stamina. Perseus’s clear wheel is heavy and symmetrical, contributing to balance.
Gravity Perseus AD145WD performs as a jack-of-all-trades. In right-spin, the Gravity wheel has decent smash attack; in left-spin, it gains some spin-steal/equalization ability. With the WD, Perseus can center itself and spin for a good duration, acting much like a pure stamina Bey but with the option to use left-spin to counter an opponent.
While not the absolute top in any category, Gravity Perseus does not have glaring weaknesses. It’s heavy enough to take hits (though not as heavy as 4D wheels), its stamina is good thanks to WD, and it can adapt spin direction. Many competitive players use Gravity Perseus as a base for customs (it is prized for its versatility).
As a stock combo, if you put it in left spin against a right-spin stamina opponent, Perseus can sometimes equalize and win by a small margin. Against an attacker, its relatively heavy wheel and WD’s stamina might survive a knockout attempt and win by outspin. One limitation is that WD has poor grip, so Perseus can be KO’d by strong hits (hence it’s not a true Defense type).
Gravity Perseus stock is quite popular among bladers who value flexibility. It might not top a “best-of” list in any single type, but it’s frequently mentioned as a strong stock combo. Almost every part on Gravity Perseus is useful.
In limited-format tournaments (excluding 4D), Gravity Perseus AD145WD is actually considered a top-tier combo for stamina. It may not dominate like Phantom or Diablo, but Gravity Perseus remains one of the strongest and most versatile stock Beyblades, fitting the Balance category perfectly.
4. Fusion Hades (Fusion Hadès) AD145SWD (Metal Fury/4D)
Series: Beyblade Metal Fury (4D, 2012) — Takara Tomy BB-121, Hasbro “Fusion Hades” Hyperblades
Fusion Hades AD145SWD is a Balance type that introduced the Fusion Wheel “Fusion” (or Hadès), which has a metal core and a plastic outer frame with rubber strips. Fusion wheel can switch between a “Defense Mode” (rubber inserted for shock absorption) and “Attack Mode” (rubber exposed for more aggression). The stock track is AD145 (same as Gravity Perseus’s, adding some downforce) and the tip is SWD (Sharp Wide Defense) — essentially a wider version of a sharp tip, giving a blend of stamina (sharp center) and stability (wide perimeter).
Fusion Hades in stock form is quite well-rounded. In Defense Mode, the rubber strips on the Fusion wheel are recessed, making the wheel mostly smooth metal — this gives good defensive properties and reduces recoil. In Attack Mode, the rubber sticks out, adding friction on contact (useful for attack).
Hades’s performance in battle is balanced: it’s heavier than most pure stamina types and thus can take a hit, and the SWD tip offers better stamina than flat tips but more grip than a pure sharp. As a result, Fusion Hades can outspin many opponents while also resisting knockouts.
It won’t have the raw stamina of Phantom Orion or the raw defense of Diablo Nemesis, but it handles different situations really well. One issue is that the SWD can be a bit aggressive if the Bey wobbles (the wide edge might scrape a bit), and Fusion wheel’s rubber in Attack Mode doesn’t hit as hard as one might like (it’s more for spin steal than smash).
It often outperforms a lot of mid-tier combos by simply not having a major flaw. But it’s often overlooked due to being released near the end of 4D. Fusion (the wheel) isn’t a top-tier attack wheel like Flash or VariAres, but it’s useful for defense setups. The Bey being quite rare (and as a result, expensive) also doesn’t help.
Stock Fusion Hades has been noted as a solid Balance type; for instance, some tier lists place it decently high for having a unique mix of attributes. Hasbro’s release (with a different tip in the Spark FX series) aside, the Takara stock with SWD is preferred. While not as universally acclaimed as other entries here, Fusion Hades AD145SWD is a strong contender in Balance — a Bey that did quite well against other 4D Beys in many cases.
Dark Knight (Ronin) Dragooon LW160BSF (Zero-G) deserves mention as the first left-spin Bey in Zero-G and a spin-steal specialist. Its stock combo with LW160 (a downforce track) and BSF (Blade Semi-Flat) can spin-equalize like Meteo L-Drago, making it formidable in opposite-spin battles. Dragooon’s left-spin doesn’t have good offensive power on its own, but it serves well as a spin equalizer part.
Pegasis Bahamdia combos (like Gladiator Bahamdia SP230GF, Zero-G) in stock form have insane attack power but are hard to control — still, Bahamdia’s weight made it a Balance/Attack menace in the Shogun Steel era. Balro Balro, Revizer Dragoon, etc., from the Synchrome double packs can be considered Balance due to their mixed type nature; they are extremely powerful “stock” if we count those (often stock Synchrome combos from Zero-G are listed among the strongest MFB combos).
Lastly, Dark Bull H145SD (Metal Fusion) was a Balance type known for its heavy Hit Bull track (H145) and solid stamina tip SD — it wasn’t top-tier, but parts of it (Bull clear wheel, SD tip) were quite good.
Best Stamina-Type Metal Fight Beyblades
Stamina-type Beyblades aim to outspin the opponent. The best stock Stamina combos in MFB typically have smooth, heavy wheels with excellent balance, and tips that minimize friction. These Beyblades can spin for an exceptionally long time. Below are the top stock Stamina performers, which often define the endurance meta.
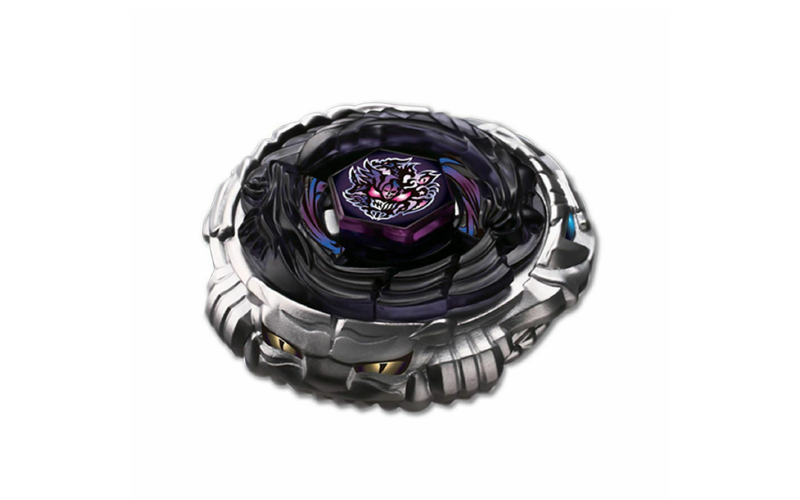
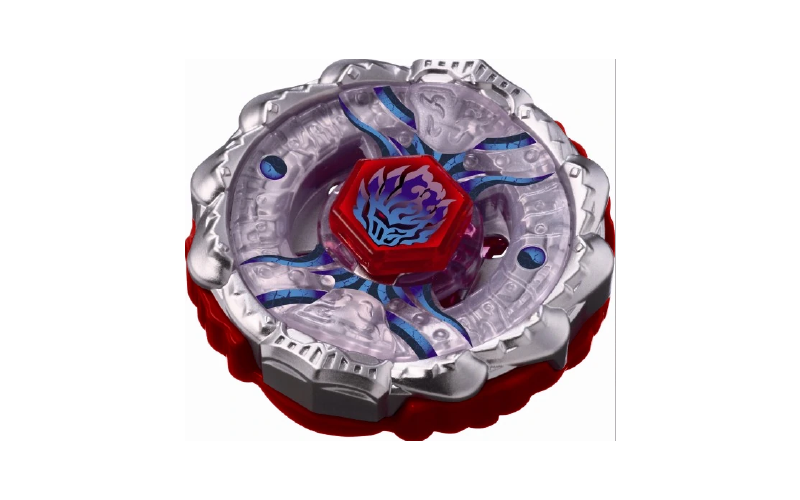
1. Phantom Orion B:D (Metal Fury/4D)
Series: Beyblade Metal Fury (4D, 2011) — Takara Tomy BB-118, Hasbro Hyperblades release
Phantom Orion B:D is a Stamina type that is arguably the most famous endurance Beyblade of the Metal Saga. It introduced the 4D Bottom Bearing Drive (B:D) — a tall spin tip containing ball bearings for ultra-low friction. The Phantom Fusion Wheel is a two-part 4D wheel (metal frame + plastic core) that can switch between Stamina Mode (frame oriented smoothly) and Attack Mode (frame flipped for more recoil). In Stamina Mode, Phantom is extremely circular and nearly flat on the bottom, ideal for reducing wobble. As a result of this, Phantom Orion has incredible spin time. It spins the longest out of all stock Beyblades. Including all generations. In fact, Phantom Orion’s claim to fame is its record-breaking spin duration. It was widely reported that Phantom Orion can spin up to 7 minutes out of the box under ideal conditions — an achievement thanks to the low-friction bearing mechanism in B:D. Note that not all B:Ds are equally good.
In actual battles, Phantom Orion B:D dominates in same-spin stamina. It maintains stability as it loses speed, thanks to its tall height and smooth wheel that allow it to “wobble” without scraping.
However, B:D’s tall, plastic tip can be a liability against heavy attackers. Like other pure stamina types, Phantom Orion is easy to knock out if struck hard. It has minimal defense, relying purely on outlasting the opponent. Against opposite-spin foes, Phantom’s lack of rubber means it can’t spin-equalize as effectively (it may lose by spin steal to something like Meteo L-Drago unless it has more LAD). Still, in a stamina showdown, few stock Beys can match Phantom Orion.
Phantom Orion is widely regarded as one of (if not the) best stock Beyblades of the entire Metal Saga. Many Bladers will immediately recommend Phantom Orion as the top pick. It may just be the best stock combo of any Bey.
Its Phantom wheel is nearly on par with Duo in stamina power, and B:D is a game-changing part (especially in Zero-G stadiums where its tall height and balance shine). In competitive rankings, Phantom Orion B:D consistently sits at the top of stamina tiers — often banned or restricted in limited formats due to how dominant it can be.
This Beyblade is the closest to the #1 strongest Beyblade in MFB you can get. Often, the only way to beat it is by luck.
- It has an excellent, free-spinning tip that can spin on anything, pretty much.
- It has exceptional balance, giving it insane stamina on different types of stadiums.
- The Beyblade has excellent defense.
- It has insanely good stamina.
- Attack power is also up there.
- Almost circular, so low recoil.
Thanks to all that, it has great balance, making it hard to knock out. The core of the wheel has great OWD (outward weight distribution), meaning the majority of weight is spread on the outsides, not closer to the center of gravity — a special quality that all good stamina-type Beys have. This core is the secret to Phantom’s great balance. On its own (without the core part), the metal frame is heavier than the Burn wheels.
It can be said that Phantom Orion is the strongest stock Beyblade combo out there. Throw anything in the stadium against it — Hades Kerbecs, Twisted Tempo, Scythe Kronos, etc., and it will either defeat them or outspin them.
Of course, you can always launch a fierce attack-type in hopes of taking it out (custom combos using Blitz or VariAres wheels, for example). If it’s an attack-type with a rubber tip, you might have a better chance. But be warned — Orion can KO or outspin a lot of Metal Fight Beyblades without even trying its best. Stamina mode is always recommended. In the Attack mode, think of it more like a Fang Leone in counter-attack mode.
2. Scythe Kronos T125EDS (Metal Fury/4D)
Series: Beyblade Metal Fury (4D, 2011) — Takara Tomy BB-113, Hasbro Hyperblades release
Scythe Kronos T125EDS is a Stamina-type centered on the gimmicky-yet-effective Scythe Fusion Wheel. Scythe has a free-spinning plastic disk (PC Frame) that can rotate independently of the metal wheel’s core in one mode, reducing friction during tilt. It’s also quite wide and relatively light, giving it a great flywheel effect. The combo uses a T125 track (Titanium 125, basically a regular 125 height) and an EDS tip (Eternal Defense Sharp), which is a sharp tip seated on a small free-spinning disk — essentially a small bearing-like mechanism for stability.
Scythe Kronos has excellent stamina due to multiple spin-saving features. The free-rotating part of the Scythe wheel means that when an opponent’s Bey makes contact at certain angles, the disk absorbs some impact and spins, rather than forcing Scythe Kronos to slow down. The EDS bottom, having a small spinning plate around a sharp tip, helps the Beyblade remain upright and reduce friction as it precesses.
In battles, Scythe Kronos can outspin many opponents in same-spin matchups and has decent defense against light attacks. It tends to sit in the center and spin efficiently, with very little wobble until the very end.
However, Scythe Kronos is not very heavy, so it can be knocked around by heavier Beyblades (it trades weight for stamina). Aggressive attackers or the absolute heaviest stamina types (Duo, Phantom) can outlast or outmuscle it. Kronos’s clear wheel also adds some aesthetic spin stabilization (modeled as an abstract “Chronos” clock design).
Bladers generally regard Scythe Kronos as a top-tier stamina stock — especially before Phantom and Duo became dominant, Scythe was a go-to wheel for endurance. The Scythe wheel has good stamina, of course, but its gimmick can be useful for defense as well. Competitive Bladers have always wanted to get this Bey because of EDS, as it has great balance out of all sharp tip variants.
In stock form, Kronos T125EDS won many stamina battles in the early 2010s. It might not have the absolute spin time of Phantom Orion, but it was a staple of stamina enthusiasts. To this day, Scythe Kronos is remembered as one of the best non-customized stamina types — often ranked just a notch below Phantom Orion in the 4D stamina hierarchy, but still extremely potent.
3. Hell Kerbecs BD145DS (Metal Masters)
Series: Beyblade Metal Masters (2010) — Takara Tomy BB-99, Hasbro “Hades Kerbecs”
Hell Kerbecs BD145DS (Hades Kerbecs by Hasbro) is a Stamina type that held the crown of longest spinning stock before Phantom Orion. Its key features are the wide Hell Fusion Wheel (a large, round wheel with a gimmick mode called “Boost Mode” when used with BD145) and the BD145 track (Boost Disk 145), which is essentially a broad round disk piece that can be attached in normal mode or flipped as a “boost” ring extending outwards. The DS tip (Defense Sharp) is a sharp tip with slight reinforcement for better balance than a plain S tip.
Hell Kerbecs is known for its aggressive stamina. In Boost Mode (BD145 flipped so it forms a wide ring under the Hell wheel), the combo gains extra LAD and stability — the disk helps keep it spinning even at low angles, almost acting like a flywheel and a guard.
It can spin a very long time; Takara Tomy famously advertised it setting a (then) world record spin time around 7 minutes (though that was under special conditions). In practical battle, Hell Kerbecs BD145DS outclasses most Metal Masters-era stamina types. It also has significant weight, giving it some defensive capability. The Hell wheel’s downside is a bit of recoil (in standard mode) and it’s outperformed in pure stamina by 4D wheels later.
But BD145 was so useful that it became a staple part for custom combos (a lot of Beys using the BD145 started coming up, though it doesn’t easily fit other wheels). As a stock, Hell Kerbecs tends to outspin opponents and even destabilize them (the wide disk can knock into lower opponents). The DS tip, while not as purely low-friction as WD, provides a nice balance of stamina and defense (it’s a bit more resistant to being knocked off its point).
Hades Kerbecs was considered the top stamina stock of the Metal Masters season. Many players still recommend it — for example, in discussing best stock Stamina, Bladers will often put it as a prime choice, albeit with a suggestion such as improving it further by swapping DS for something like WD or EWD).
The wide BD145 track, in particular, is beloved for what it brings to stamina combos. Even after Phantom Orion’s release, Hell Kerbecs remained relevant in formats without 4D parts. It has a bit of an “attack” flair too — some call it an “aggressive stamina” type because the heavy disk can smack into opponents. It’s high-tier as a stock endurance Beyblade.
Straight out of hell, this defense/stamina Beyblade has an insanely good presence on the battlefield. At 50 mm wide, the Hades wheel is one of the largest in the meta. The Boost Disk spin track can be used for a well-rounded, balanced launch. Without it, the wheel can dish out some terrifying smash attacks vs. most other Beyblades. In fact, it was released as part of the “Maximum” series (the largest wheel, later dethroned).
Normal mode makes it scrape the stadium (terrible design) and introduces a gap that can disbalance the Bey. Not recommended. The Boost mode, only meant to work with the Hades wheel, removes any gaps between the wheel and the track, making it an excellent Defense/Stamina-type Beyblade.
The wheel and tip make it an excellent stamina Bey, while almost all parts have pretty good stats across defense. For example, the BD145 is arguably one of the best defense-type spin tracks. But if you are looking to maximize stamina on the battlefield, Phantom Orion, Scythe Kronos, and Duo Uranus can often beat it.
Burn Fireblaze (Phoenix) 135MS (Metal Fusion) was an early stamina king — the Burn wheel and Metal Sharp tip could spin a long time (Burn set a stadium record in 2010), and it was a very popular stock combo. It lacks the weight of later Beys but is still notable.
Earth Eagle 145WD (Metal Fusion) and Earth Virgo GB145BS were also excellent stamina/defense hybrids in the first seasons, with Earth Eagle in particular often cited as by far the best stock combo of Metal Fusion at that time. This is mainly due to the Earth wheel and the WD tip.
Earth Eagle can beat the majority of 4D Beys (Metal Fury). It can hold its own against heavier opponents. Takara Tomy never made a better, evolved version of it because that would likely be way more powerful than intended. The wheel has four gaps, but they are so narrow that it’s virtually as good as a recoil-free, fully circular wheel (like Twisted). When heavier wheels started coming, such as Tempo, Duo, Genbull, or Revizer, Earth Eagle kind of lost its edge. But to date, it remains one of the strongest Metal Fight Beyblades due to its excellent design and balanced stock combo.
Before 230 came along, 145 was the highest track (also part of the Maximum series). Great for stamina purposes (height advantage), it begins to wobble as RPM lowers. Wide Defense is a wide defensive tip (duh) and has an interesting performance in the arena. It can use the higher contact or surface area to keep spinning even at lower RPMs. After Earth Eagle, three more Beyblades were launched with the 145WD combo: Twisted Tempo 145WD, Dark Poseidon 145WD, and the Kreis Cygnus 145WD. In a video by YouTuber The Gioverse titled “Earth Eagle vs ALL Attack Beyblade,” Earth Eagle had an impressive performance against attack-types like BBP, VariAres, Beat Lynx, Samurai Pegasus, Storm Aquario, etc.
Flame Byxis 230WD (Metal Masters) introduced the 230 track and showed how height can be an advantage — it could spin above shorter attackers, though it was somewhat unstable. Flash Sagittario 230WD (Metal Fury), as mentioned, is technically a stamina-type out of the box and indeed performs well in that role; yet its real claim is the Flash wheel’s explosive attack when customized.
Lastly, in Zero-G, Bandid Genbull F230TB (Shogun Steel random booster prize) deserves mention — it came with the infamous F230 free-spinning track that, when paired with a tall tip like TB (Twin Ball), gave it immense spin-equalization and stamina potential. Stock Genbull F230TB by itself was strong, and the F230 part became a meta-defining piece for spin-steal combos.
Most Powerful Attack-Type Metal Fight Beyblades
Attack-type Beyblades rely on high speed and smash power to KO opponents. The best stock Attack MFB combos tend to have heavy or gimmicked Fusion Wheels and aggressive tips (including low-friction rubber tips) for maximum impact.
1. VariAres D:D (Metal Fury/4D)
Series: Beyblade Metal Fury (4D system release, 2011)
VariAres is a dual-spin Attack type known for its exceptional smash attack power. Its 4D Metal Wheel (VariAres) features three large blades and can spin in both right and left directions, giving it versatile attack angles. The stock Delta Drive (D:D) bottom allows mode changes (from a flat to a sharp tip), adding adaptability in battle.
In competitive play, VariAres is regarded as one of the hardest-hitting Attack wheels of the 4D era. Its ability to spin both ways lets it exploit opponents’ spin direction (e.g. countering right-spin defense combos).
The primary mode used is the flat tip for full aggression — in this mode, VariAres can deliver knockouts even against heavy opponents. However, its recoil is high; missing attacks or going into stamina mode too early can cost it the match.
One of the best smash attackers of its time. Its dual-rotation feature keeps it highly viable in tournaments. Even compared to later wheels, VariAres’s raw attack power remains feared. Its stock D:D tip isn’t the absolute best for pure attack (tornado stalling is possible, but D:D’s sharp mode is rarely useful mid-battle), yet the combo’s overall potency lands it among the strongest stock Attack types.
2. Blitz Unicorno 100RSF (Metal Masters/4D)
Series: Beyblade Metal Masters (2011) — released in the 4D system’s early wave
Blitz Unicorno (also known as Blitz Striker) is a right-spin Attack type featuring the Blitz Fusion Wheel, which has a three-bladed design geared for smash attacks. Just by look, you can see it’s designed to attack with heavy recoil and insane power. Its stock setup comes with a 100 track (low height for undershooting opponents) and an RSF (Rubber Semi-Flat) tip for raw speed. The RSF tip provides a mid-ground between aggression and control — it’s rubbery for grip but with a flatter profile than an RF tip.
Blitz’s metal wheel produces high smash attack in right spin and was considered one of the best Attack wheels until the Flash wheel emerged. In stock form, Blitz Unicorno’s low height (100) can get under taller opponents to destabilize or knock them out. The RSF tip gives it a bit more stability and defense than a full flat, at the cost of some speed.
Blitz can deliver explosive hits, but its own recoil could be its downfall — missing a KO early means the combo loses spin fast due to self-recoil. Overall, it’s a “glass cannon” attacker: devastating when it lands hits, but stamina is limited.
Blitz Unicorno is fondly remembered as a top-tier stock in the late Metal Masters era. This was the best smash attacker for right-spin, though slightly under Flash in pure power. Bladers praise Blitz’s design and use its parts for custom combos. As a stock combo, it’s strong, albeit sometimes classified as more of a Balance type due to RSF (which provides defense). Still, Blitz Unicorno’s out-of-box performance is strong enough to rank among the best Attack types.
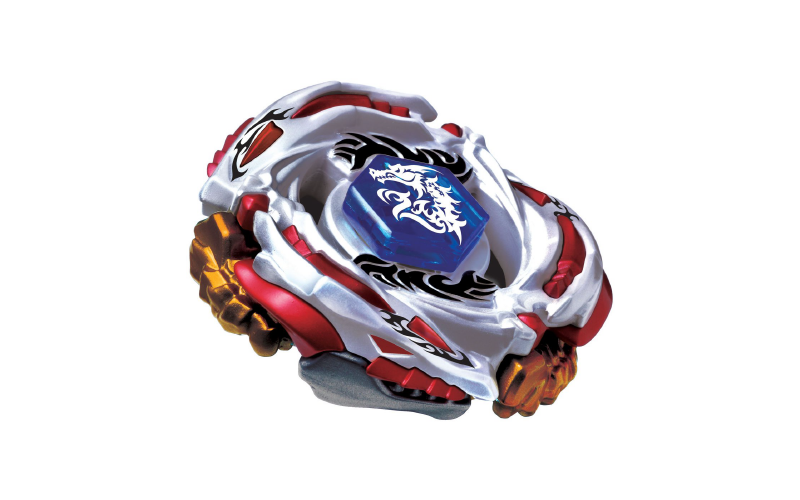
3. Lightning L-Drago 100HF (Metal Fusion)
Series: Beyblade Metal Fusion (2009) — the first left-spin Metal Saga Beyblade (anime only, as the PHW L-Drago 105F was only shown in the manga)
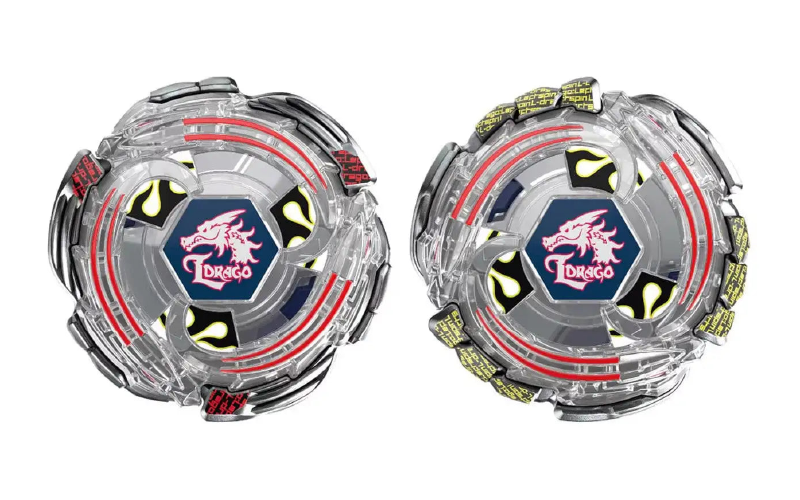
Lightning L-Drago 100HF, known as Ryuga’s “Forbidden Bey,” is an Attack type that spins left. Its Lightning metal wheel and L-Drago clear wheel together form a three-pointed dragon design built for upper attacks. The stock setup has a 100 low track and an HF (Hole Flat) tip, which is a plastic flat tip with a hole for slightly reduced friction.
In real play, Lightning L-Drago proved to be one of the deadliest Attackers of the early MFB era. Its left-spin direction allows it to “catch” right-spin opponents and induce recoil effectively. Lightning L-Drago has insane upper attack power — it can lift and smash opponents out of the stadium when used with a strong launch. With a flower pattern favoring you, it can sometimes kick out much, much heavier opponents in unexpected finishes.
Despite using an HF tip (less grip than rubber), its aggressive movement and the low 100 track give it a big edge against taller stamina types of its era. Lightning L-Drago’s weaknesses are a lack of stamina (HF isn’t great for long spin) and some inconsistency if it fails to hit hard early. It can also self-KO due to its speed, though the relatively controllable HF tip helps compared to a full rubber flat.
Many consider it underrated only by those who focus on the anime’s portrayal of Meteo L-Drago’s spin steal. In reality, Lightning L-Drago’s raw attack is superior to Meteo’s stock performance (which suffers from low weight). It was even capable of KO’ing heavier combos in the early 2010s meta.
Lightning L-Drago 100HF remains a benchmark for pure attack power in a stock Beyblade, especially notable for being a first-generation Metal Fusion release. Here at SpiralForge, we have perfected it by making it completely in metal. Check out the full-metal Lightning L-Drago that can beat much stronger Beys due to its higher RPM and weight.
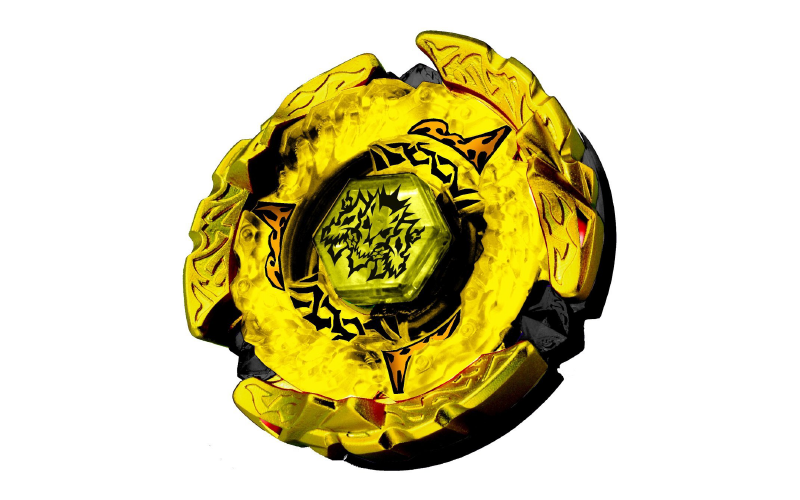
4. Big Bang Pegasis F:D (Metal Fury/4D)
Series: Beyblade Metal Fury (4D system, 2011) — known as Cosmic Pegasus in Hasbro release

Big Bang Pegasis (Cosmic Pegasus) is an Attack type and the final evolution of the Pegasus line in the anime, owned by Gingka. Its 4D Fusion Wheel “Big Bang” has multiple mode configurations (four parts that can shift) and the stock bottom Final Drive (F:D), which starts as a semi-flat tip then automatically switches to a rubber flat/hole flat mid-battle as spin slows. This gives it a built-in mode change from endurance to attack.
In stock form, Big Bang Pegasis is a high-speed attacker. The Big Bang wheel’s design can produce strong smash attacks, especially in its “Upper Mode” (where the metal frame is aligned for upward hits). The rubber-coated F:D bottom begins with a sharp point. Then, as its spin decays, F:D’s tip contracts into a flat or hole flat made of hard rubber providing a burst of aggressive movement and smash.
In theory, this makes it a balance of attack and stamina. In practice, Big Bang Pegasis can hit hard, but its effectiveness is a bit inconsistent. The mode change sometimes occurs too late or at an inopportune moment — once it switches to the flat tip, it becomes too fast and consumes all stamina quickly. This is less controllable for attacking, as you can’t launch with a flower pattern, and hope that it enters the flower pattern on its own. In many cases, it will not enter the pattern and use up all of its spin without hitting the opponent, which might be in the center already and immune to fast hits aimed at the outer edges of the stadium.
Moreover, Big Bang’s smash power, while solid, was eclipsed by other 4D wheels like VariAres and Flash in competitive circles. It also suffers from recoil due to its mode gimmicks.
Big Bang Pegasis is often cited by fans and was a marquee Beyblade, but competitively it’s viewed as good but not the very best. Some advanced players note that VariAres’ D:D outperforms Pegasis’ F:D in practice, largely because Big Bang Pegasis can be tornado stalled and then loses momentum once F:D shifts.
That said, the combo is still considered one of the stronger stock attackers, especially in a standard stadium. It’s recognized as a top stock pick by many, just not the top. Its popularity and decent performance keep it in the conversation of strong Attack types, even if other combos have a competitive edge.
Flash Sagittario 230WD (Metal Fury) deserves mention — it was packaged as a Stamina type (with a tall 230 track and WD tip), but its Flash wheel has legendary smash power. In fact, Flash is regarded as the strongest 4D attack wheel in history by many. In stock form, Flash Sagittario can function as a stamina type that can surprise opponents with KO potential due to the Flash wheel’s oval shape and weight. An oval or elongated shape, when it connects correctly with an opposing Bey, is like hitting the opponent with a hammer at high RPM. Most Beys don’t like being hit by a hammer.
Galaxy Pegasus W105R2F and Storm Pegasus 105RF (Metal Fusion) are also iconic attack stocks thanks to their rubber flat tips, though their metal wheels (Galaxy, Storm) are outclassed by later wheels. Lastly, Meteo L-Drago LW105LF (Metal Masters) is technically labeled an Attack type but is used for spin-stealing.
Strongest Defense-Type Metal Fight Beyblades
Defense-type Beyblades prioritize weight, low recoil, and stability to withstand heavy hits from attackers. The strongest stock defenders in MFB history usually feature very heavy Fusion Wheels and tips that resist knockouts (wider base). With a mostly circular shape, many defensive Beys spread the hit from the opponent (like an attack-type) really well, while having minimal self-recoil. Their weight distribution is also sometimes a key feature of them outspinning their enemies.
Below are the top stock Defense combos known for real-world durability.
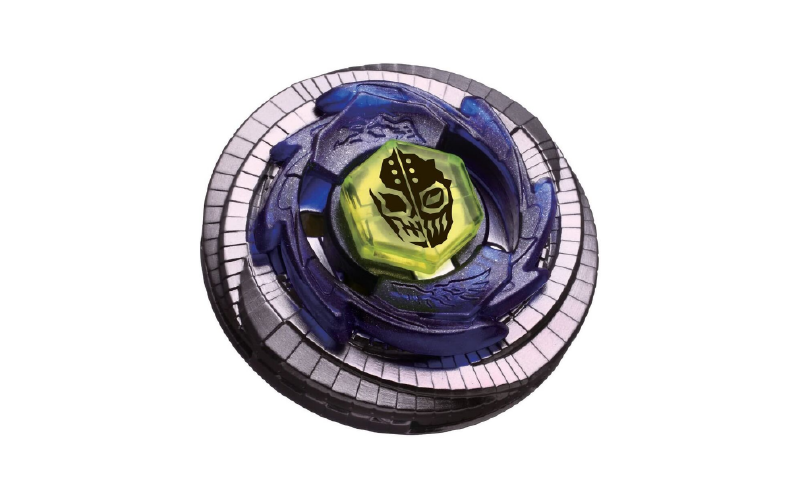
1. Basalt Horogium 145WD (Metal Masters)
Series: Beyblade Metal Masters (2010) — Takara Tomy BB-104, Hasbro “Twisted Tempo”
Basalt Horogium 145WD is a Defense-type stock combo that became legendary for its weight. Its Basalt Fusion Wheel (renamed “Twisted” by Hasbro) is a solid disk with minor ridges — at 47+ grams, it was the heaviest wheel upon release. Basalt’s only quirk is a small cut-out section on its underside, dubbed the “Spiral Staircase of Death,” which creates a slight imbalance. The rest of the combo includes a 145 height track and a Wide Defense (WD) tip, which is a broad, rounded tip ideal for stamina (though somewhat vulnerable to being knocked off balance).
At the time of its debut, Basalt Horogium dominated the defense meta. Its sheer weight and relatively round shape made it extremely hard to budge — even strong attackers struggled to KO it as it would absorb hits with minor movement. The added weight also gave it impressive spin endurance; Basalt on a WD tip could outspin many opponents while tanking their attacks.
Basalt Horogium’s main weakness was against extreme smash attackers that arrived later — a hard enough hit could topple or KO it despite the weight. Also, the introduction of 4D and Zero-G brought heavier wheels that eventually surpassed Basalt’s weight class.
For a period, Basalt Horogium was considered the best defense wheel and even verged on overpowered. Basalt, on sheer weight alone, could outclass previous top-tier Defense combos like Earth or Libra. Even as of 2020+, many bladers still regard Twisted Tempo as a must-have. However, later parts (e.g. Duo, Revizer, or even Basalt with better tips like CS or RS) outmoded the stock Basalt Horogium. Basalt Horogium’s only truly top-tier part that aged well is the WD tip (still great for stamina), whereas the Basalt wheel itself, while in no way bad, cannot fully hold ground against the heaviest 4D/Zero-G attackers like Flash Sagittario.
One of the most balanced and the most circular MFB out there (in fact, not just MFB, but across all of Beyblade generations), Twisted Tempo can take on hits for a long while before winding down. If opponents are not careful, then no matter what their advantage, attack pattern, or superiority is, they can lose.
One of the most versatile Defense wheels, Twisted is the second heaviest fusion wheel after Diablo. It is perfectly circular with ridges. It is quite heavy, and its inside was completely uniformly circular too. As it turned out, that was too OP (especially at the time of release, before 4D Beys). So, Takara Tomy had to imbalance it by taking a chunk out from the inside, thus making the shape more like a staircase.
This made it weaker, surely, but Twisted Tempo is just so powerful that even with that, it is currently one of the strongest Beyblades with the longest in-battle stamina. 4D Beys outclass it for sure (Diablo is heavier, and Phantom/Scythe are both better in stamina), but the Bey can still defeat the majority of 4D Beys when launched powerfully in a defense/stamina stadium.
The wheel’s built-in imbalance causes a bit of wobble, but this turned out not to hinder it much in practice. In fact, the wobble could even help reduce opponent spin (by introducing recoil on contact), effectively slowing down the opponent while Basalt kept spinning. So, Takara’s plan to nerf it by taking a chunk out didn’t really nerf it that much.
The wheel can also make some great downforce for attacking potential, though that’s not its forte. And let’s not forget — the perfectly circular shape is ideal to basically remove all recoil from the Beyblade (the opposite of attack-type Beyblades). This gave Twisted Tempo the title of the “King of Defense” back in the day. It continues to honor that title even today.
It’s not meant to spin forever and outspin other stamina-types. But it can take hits really well, spread the impact, and absorb the enemy’s attacks to wear it out (attack types typically have crap stamina).
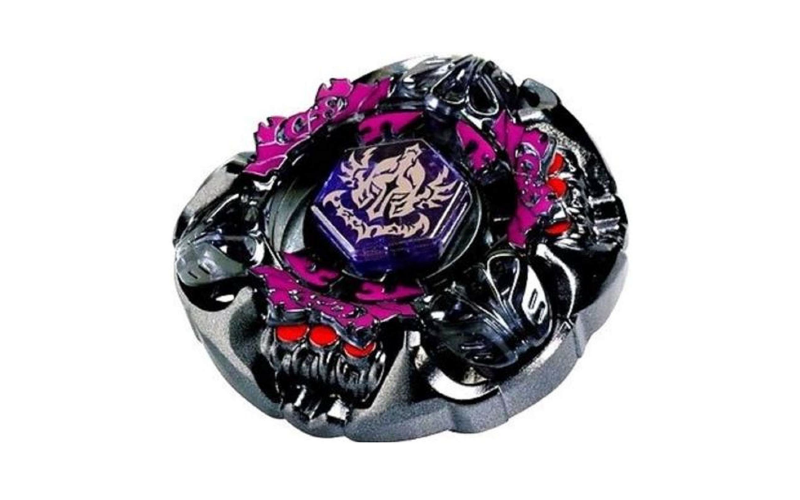
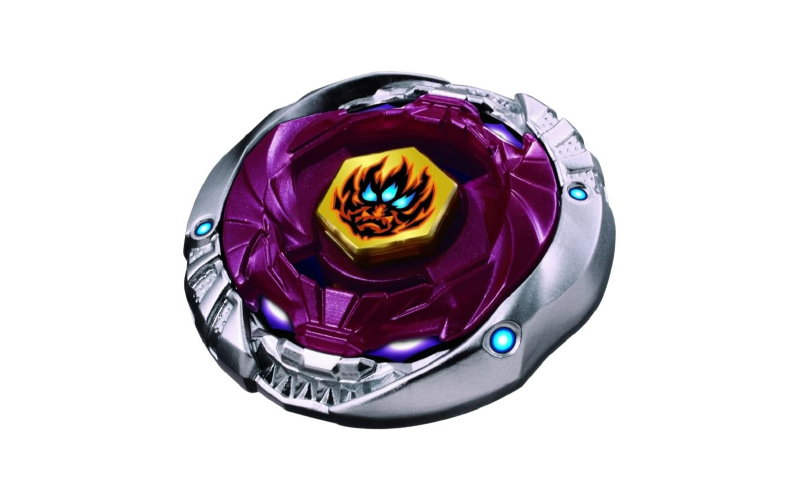
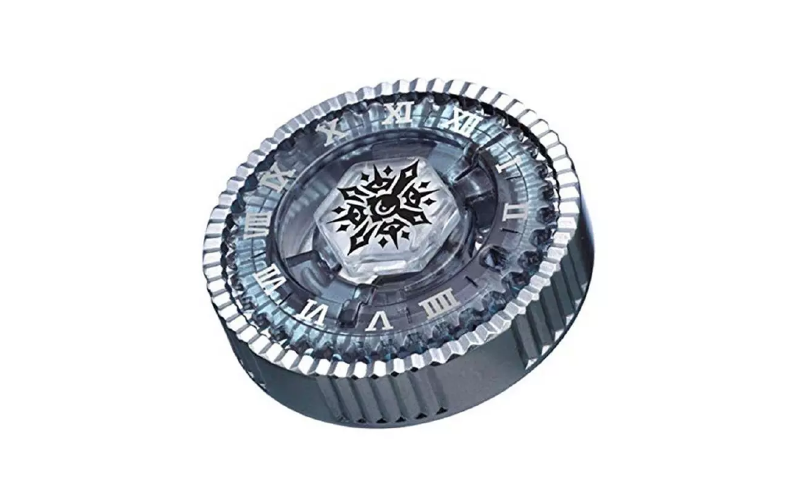
2. Death Quetzalcoatl 125RDF (Metal Fury/4D)
Series: Beyblade Metal Fury (4D, 2011) — Takara Tomy BB-119 starter
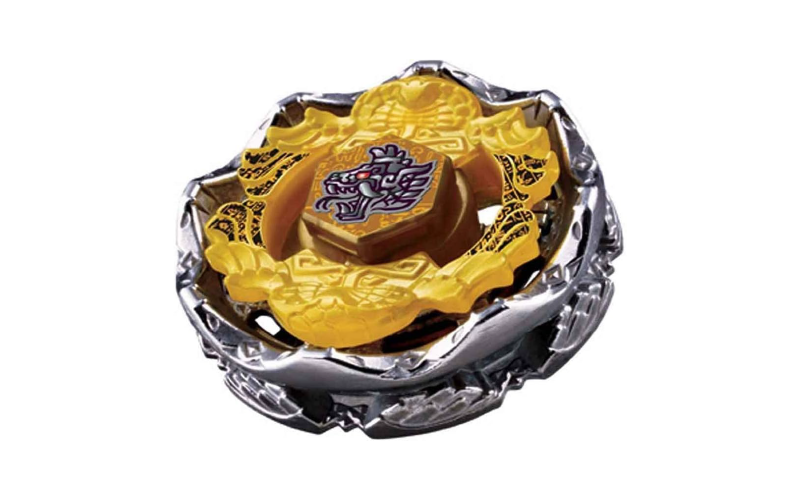
Death Quetzalcoatl 125RDF is officially classified as a Balance type, but in practice, it performs with exceptional Defense and Stamina. It features the Death 4D Fusion Wheel, which has two modes (Attack Mode and Defense Mode) — in Defense Mode, the wheel is very circular and heavy, ideal for minimizing recoil. The stock track is 125 (mid-height) and the tip is RDF (Rubber Defense Flat), a unique part that combines a wide flat surface with a rubber material. RDF provides both a degree of attack movement and a lot of friction to resist knockouts, making it a top-tier Defense/Stamina hybrid tip.
Death Quetzalcoatl’s competitive reputation is stellar. The Death wheel in Defense Mode offers amazing defense and stamina, while not quite as much pure stamina as the Duo wheel, it is extremely well balanced.
As a stock combo, Quetzalcoatl can comfortably outspin many opponents due to the smooth Death wheel and the stability of RDF. Its rubberized flat tip gives it grip on the stadium floor, so it’s hard to KO, yet RDF’s shape also provides Life-After-Death (LAD) — meaning it can keep spinning a bit when tilted, especially useful against low-stamina opponents.
This makes Death Quetz one of the few stock Beyblades that can both tank hits and outlast opponents. The 125 track height is somewhat low, which can be advantageous to avoid being destabilized from below, though against very low attackers, it may take hits to the metal wheel (like from 85XF or 100HF).
It’s often ranked as one of the best stock Defense (or Balance) Beyblades of the 4D series. Also, the RDF bottom is a must-have part for top-class Defense and great spin-equalization in opposite-spin battles (for more LAD to avoid getting tied or losing to spin stealers like Meteo). Many tournaments allowed Death combos to flourish, and even without customization, Quetzalcoatl can hold its own in competitive settings.
It’s frequently cited alongside Phantom Orion as a top 4D Bey; while Phantom is pure stamina, Death Quetzalcoatl brings a balance of endurance and defense that few stock combos can match.
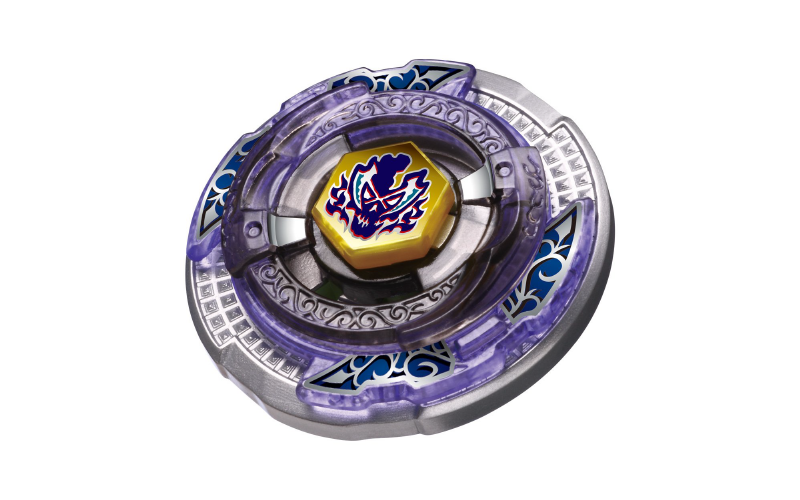
3. Duo Uranus 230WD (Metal Fury/4D)
Series: Beyblade Metal Fury (4D, 2012) — released in the Ultimate DX Set (Takara Tomy)
Duo Uranus 230WD is a Stamina/Defense type stock combo that was part of a special set rather than a standalone starter (the Ultimate DX Set also included Wing Pegasis and L-Drago Guardian). The Duo Fusion Wheel is a perfectly circular, thick wheel with outstanding weight distribution, often considered one of the best wheels ever made. The stock combo uses the tall 230 track (one of the highest tracks, good for stamina and avoiding low attacks) and a WD tip.
Duo Uranus in stock form is a stamina specialist with defensive heft. The Duo wheel has extremely low recoil — it’s so smooth and heavy that it can shrug off hits almost as well as Basalt, yet unlike Basalt, it has no imbalance issues. This makes Duo exceptional for both stamina and defence. A Duo 230WD combo can spin for a very long time, and if Phantom Orion’s B:D didn’t have ball bearings, Duo would outspin it.
The 230 track raises the Beyblade’s center of gravity, which can make it a bit more wobble-prone late in battle, but it also means shorter opponents have trouble reaching its core to deliver strong attacks. Duo Uranus’s WD tip provides great stamina, but, as with any WD, can be vulnerable to being knocked sideways by a strong hit. However, Duo’s weight and balance mitigate that risk substantially.
Duo Uranus 230WD is universally regarded as top-tier in competitive circles — in fact, Duo was so good it was one of the few 4D wheels that could stand up to the later Synchrome combos of Zero-G. At one point, Duo was considered the most powerful stamina/defense 4D wheel in MFB, outclassing Basalt.
As a stock combo, Duo 230WD has everything you’d want: high spin time, great resilience, and versatility. Its only drawback is that it was less accessible (being in a set). Nonetheless, those who have used it often consider Duo Uranus (or the identical Duo Ice-Titan name under Hasbro) as one of the strongest stock Beyblades ever, especially for stamina/defense purposes.
It’s frequently matched up with Phantom Orion in discussions of longest-spinning Beyblades. Simply put, Duo Uranus 230WD is a stock powerhouse that every serious MFB player respects. The Uranus/Ice-Titan Energy Ring is one of the lightest and the smallest ring in MFB.
Fang Leone 130W₂D (Metal Fury) was Kyoya’s 4D Beyblade and a solid stock defender — Fang’s metal wheel in Defense Mode is thick and heavy, and W₂D (Wave Wide Defense) gives it decent stamina with some aggression. It’s good, but Fang’s recoil is higher than Death or Basalt, so it’s a notch below the top tier.
Jade Jupiter S130RB (Metal Fury) featured a free-spinning metal ball gimmick; it had potential and RB (Rubber Ball) is a strong defense tip, but the Jade wheel was a bit light for Standard format (it shines more in the Limited format). From Metal Fusion, Earth Eagle (Aquila) 145WD was famed as an all-around defensive Bey — it had excellent synergy and was arguably one of the best stock combos in the series for its time. Earth Eagle’s balance of stamina and defense made it an early benchmark, although later heavier wheels outclassed it.
Finally, the Zero-G/Shogun Steel era introduced the Revizer wheel, which, when double-layered (in Synchrome), becomes an incredible defense combo. In stock form, Guardian Revizer 160SB (Zero-G starter) is very tanky, and if one counts the Synchrome sets as stock, combos like Revizer Revizer or Genbull Dragooon are among the heaviest, strongest defenses ever, though they require two Beys to assemble (the community sometimes counts “stock Synchrome combos” as part of Metal Saga’s strongest, since official sets provided them).
Wrapping Up
It’s worth noting that the Metal Saga’s final season (Zero-G) introduced Synchrome technology, where combining two metal wheels created an even heavier Beyblade. While these typically involve custom building, a few were sold as complete combos. For example, Genbull Dragoon F230CF or Revizer Revizer from sets could be seen as “stock” heavyweights — these are extremely powerful, essentially on par with or exceeding the above in specific formats. However, within the traditional definition of stock (one Bey’s original parts), the models listed above are the consensus top performers.
So, in real-world competitive performance, Phantom Orion B:D is the superstar for stamina, Diablo Nemesis for sheer power, and other Beys like VariAres, Basalt Horogium, Death Quetz, Duo Uranus, etc., fill out the roster of the Metal Saga’s strongest stock combos across each type. These Beyblades have proven themselves in the stadium time and again — earning their owners many a victory with no part swaps needed.
